How to Take Digital Photos of your Model Car

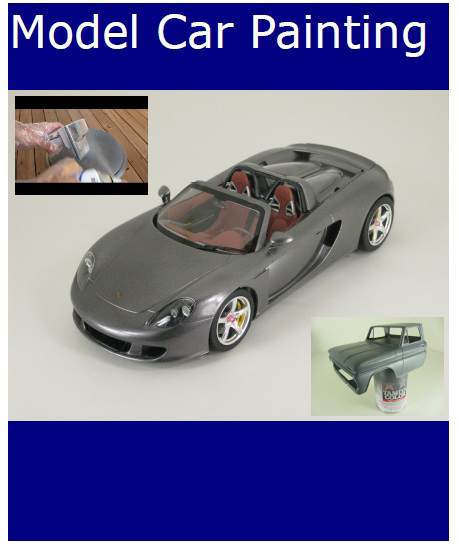
Above: 1/24 scale Porsche Carrera GT kit by Tamiya. Photographed with Canon Powershot SD790 IS, compact fluorescent lighting in photo booth.
Introduction
Now that you've built and painted your masterpiece, you'd like to take photos to share with your friends and family. A good photo can really enhance the quality of a model car. If you've admired some of the photos on our site and wondered how we do it, here's how.
Camera
We used a Canon Powershot SD790 IS digital camera for all of the model car pictures on our site. This camera features:
- High quality lens
- 3x optical zoom
- Auto mode if you like to take simple, one-button pictures
- Manual mode with lots of features
- There is also a Movie mode.
- Macro mode. Allows you to get in close for those model car interior and engine close-ups.
- Countdown Timer. Pressing the shutter with the timer activated gives a 10 sec delay before the photo is taken.
With the camera placed on a tripod, the timer means less chance of the camera being moved while trying to press the shutter. This is important for low light conditions, close-ups, and when trying to achieve large depth of focus photos.
Large depth of focus means that most of the image is in focus. This is good, because the viewer can see many features of the model in one photo. To achieve this, use the manual controls of the camera to reduce the aperture, i.e. increase the "f-stop".
Composition
Think about your photo surface and a background. You can photograph your model on your workbench or in your living room, etc. Just remove extra items from the area as these will distract the viewer. You can paint a section of road or parking lot onto a piece of foam board, and re-use this for several model car photos.
Place the camera at a low angle relative to the car, to give a scale eye-level perspective to the shots. Shoot from above if you really need to show the upper surfaces of the model.
Below: Taking pictures of the model car in a photo booth.

Lighting
We like to use Studio light. Use at least two lamps illuminating the model from different directions, to help eliminate distracting and detail-hiding shadows. We use a photo booth made of foam board panels, illuminated with 4 compact fluorescent lights. A hole in the top of the box allows direct overhead shots.
Natural light can be used if available. Avoid direct sunlight and its harsh shadows. The best times of days for outdoor shots are early morning or late afternoon, when the sun is low in the sky. Sunlight can also be used indoors, if you have a large glass door or window. In this case, the light may be one-directional, so try adding a lamp or reflecting board to reduce shadows.
Shooting
If your camera has a timer, use it. Wiith the tripod, this will eliminate any camera shake from low shutter speeds that may be needed in low-light or close-up situations.
Take several shots, varying the angles, zoom, etc. Since there is effort involved in setting up the shoot, get several shots to choose from.
Set the camera settings to get best picture quality. You may wish to make enlarged prints later. For loading up to the web, you may need to edit those large (multi Mb) files down to less than 100 Kb.
Editing
There are many photo editing programs available, with similar features. We like to use Adobe PhotoShop 7.0. Here are some of the features that come in handy:
Crop - You will sometimes need to crop your photos, to remove part of the background. Good cropping can turn an ordinary photo into an excellent one.
Brightness - Digital photos can turn out darker than expected. Increase the Brightness (sometimes called Level) if needed.
Contrast - Not used as often as Brightness adjustment, but still useful.
Special Effects - You can add special effects such as grayscale (black and white), sepia tones, artificial aging, soft focus, halo effects, solarization, etc.
Size - When saving the file, you can set a reduced image quality, which translates into a smaller file size. The image quality reduction may not be visible on a computer screen. You might also be able to reduce the image size, by setting the number of pixels width and height shown in the image.
File Format - The common image format is jpeg, so save in that format if your program allows.
Send us your comments below! Login with your Facebook, Twitter, Google or Yahoo account.